How To Make A Lace Front Wig By Yourself? This Guide Make It Easy

Are you thinking of making a lace front wig by yourself? That's a challenge but sounds fun and great!
The lace front wig offers a natural look no one can resist. It's not far to wonder if you can make one at home successfully. Yes, you can! Besides, it becomes easy with a little help from our end.
So, follow the steps we'll be explaining below to make a good lace front wig. Our quick guide offers you the ‘how’ and a few tips to help you as you go.
Tools You Will Need
Before you get started, here are the tools you will need and be making use of:

1. Thread
2. C-curve needles
3. Canvas mannequin head
4. Dome mesh cap/Spandex cap
5. Hair Bundles
6. Lace Frontal
7. Elastic band
8. T pins
9. Scissors
10. Mannequin head holder
11. Tweezer
12. White marker
Steps On How to Make a Lace Front Wig
Step 1: Secure the dome cap on canvas head

First, set up your canvas head to the mannequin head holder.
Then, place the dome cap on the canvas mannequin head. Make sure it's centered.
You should pin the nape of the cap for extra security.
Step 2: Place the frontal on dome cap
Pick up the frontal and place it on the dome cap. This part is to lay the foundation of the wig-making process. So, be sure it's centered accurately.
Let the frontal sit on top of the mesh cap and mannequin head. That way, you're sure it's rightly done. You can make adjustments if there's a need.
Step 3: Secure the frontal
Get some T-pins, and start to pin the frontal. Make use of the dome material as a guide. But be sure that about ¼ inch is in front of the dome cap.
You should start pinning from the center before moving to the sides. While you do that, do not leave any space under the frontal. You want it to be as flat as it can.
Step 4: Make sure the hair of the frontal away from the canvas head
Braid or pin the hair of the frontal out of the way. That’s a great way to prevent any form of interference.
Step 5: Do white marker for the wefts to track
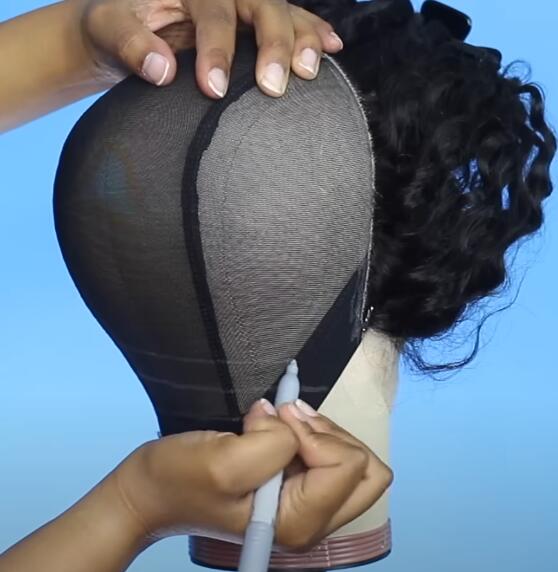
Here is where your white marker comes into play.
- So, pick it up and trace an outline of the frontal onto the mesh dome cap.
- Next, you want to trace the areas where you will lay your wefts. You should start from the nape of the neck to make it simpler.
- Simply draw the line from one end to another. Make sure it's straight because you'll be sewing on the outline.
- The gap between each outline should be small, except you will be sewing with a machine. In that case, an inch or finger apart is fine.
Regardless, it’s best to have the number of bundles you will use in mind. It will help determine if the lines should be further apart or closer.
Step 6: Preparing for sewing
(This step is for those sewing by hand). Now, place your thread through a curved needle, even the threads out, and tie a knot at the end. You can repeat this for as many needles as you like. It can make the work faster without as many pauses as you sew.
Step 7: Start sewing
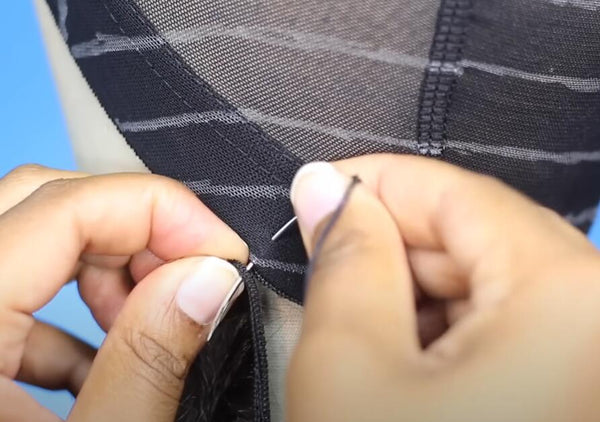
Start sewing by picking a hair bundle and placing the weft on the line you drew on the mesh dome cap. From the nape of the cap and work your way upwards.
- So, the first thing is to put the needle through the cap and track. Then, place the needle into the hole of the thread. That allows it to be secured. You should know that you'll repeat this step only at the beginning and end of every line.
- Continue to sew by bringing the needle through the cap and around the track. You can preserve your wig this way. Also, let the needle pass through the loop of thread to make the wefts strong on the cap.
- When you get to the end, repeat the sewing pattern you started with; first, through the dome mesh cap, and track. Then, place the needle into the hole of the threads. You should repeat this a few times to create a stronger knot.
Step 8: Repeat the sewing process
Cut the thread with your scissors and move to the following line. Repeat step seven till you've sewn your bundles to the mesh dome cap.
You can use a sewing machine if you have one. But double your wefts and sew them on the lines you've drawn on the mesh dome cap.
Step 9: Sew the frontal on the dome cap
After sewing all your wefts to the cap, it's time to work on the frontal. Sew the frontal with your hands following the technique we explained earlier.
You want to go through the frontal and the mesh dome cap, securing it tightly. Follow the line you drew so it's straight and flat. Remember to take the thread through the frontal and mesh dome cap. Sew till you reach the other end of the cap.
Step 10: Cut off the excess cap

Now you are almost done. After finishing all the sewing, turn the wig inside out and cut off the excess cap. Be careful, don't cut your lace.
Step 11: Sew an elastic band inside

Flip the wig inside out and sew the elastic band on the sides. You want it to be well-secured.
Step 12: Bleach the knots, pluck the hairline, cut off the lace
You can go ahead to bleach the knots of the wig if you love your wig to have a natural appearance.
Also, use your tweezers to pluck the front of the wig so it looks like your hairline. Cut the excess lace and style the way you want.
There it is, your new lace front wig.
Key Things to Note
● If you're sewing with a machine, be careful of pulling or stretching the cap while you sew. If you do, it can cause shrinking.
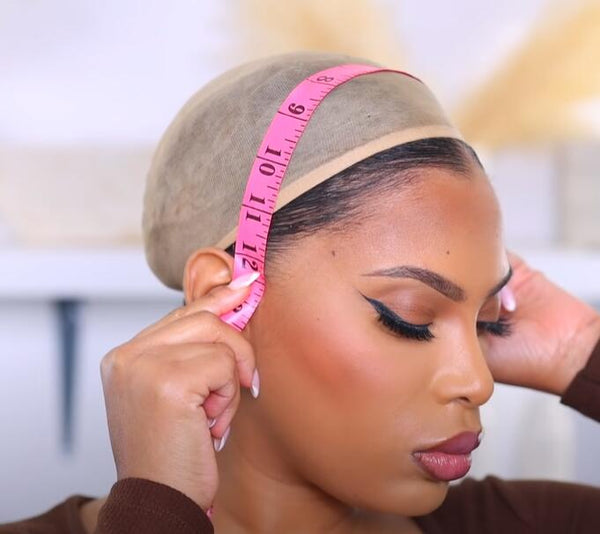
● You want your wig cap to be the size of your head. So, check out your head size by measure your head with a soft tape measure before deciding on which cap to buy.
● The canvas mannequin head comes in different sizes and lengths. Choose and work with one that's the size of your head measurements.
● Make sure your knots are properly tied using the method above. Your track remains secured that way.
● Never skip the pattern step. It makes the sewing easier, straight, and accurate. You can avoid making mistakes if you follow through.
FAQ

Is it expensive to make a lace front wig?
Making a lace front wig by yourself is considered cost-effective since lace front wigs are very expensive. It can cost you hundreds of dollars to own a high-quality one. But if you buy your bundles and make them yourself, you will save you some money.
How do I choose the right hair for the homemade wig?
Get high-quality hair bundles from a reliable vendor. You may want to find out if the wefts are intact because you won't need to cut them away.
Moreover, your hair bundle choice depends on your needs. Would you like a curly, straight, or wavy hair? When that is decided, you can make your purchase.
How many bundles will I use for my lace front wig?
It depends on how full you want your lace front wig to be. Four to five bundles will give you a full wig. But three hair bundles are enough to make a lace front wig.
Consider your needs to know how many bundles you'll need to buy.
Related read: How many bundles do you need for a perfect sew in
How long does it take?
It might take you a longer time to complete a lace front wig if this is your first time making a wig.
However, if you've pre-bleached your frontal, and done a few steps out of the way, it takes less time to complete a lace front wig.
You can make a wig within a few hours if you follow our steps.
Are lace front wigs should be glued on?
Yes, lace front wigs can be glued on. However, there are the glueless lace front wigs as well. While the work of the glue is to keep the wig secured on your head, you can substitute it for other options such as using clips and adjustable straps on the cap.
We've explained how you can attach elastic bands to your lace front wig, so check it out.
What is the difference between a lace front wig and a regular wig?
There are several differences between the two. A few are:
Lace front wigs have a breathable construct due to the material of the mesh cap. A regular wig does not, making it unsuitable when it's hot.
The styling options also vary. A lace front wig has multiple styling options, but that's not the case for a regular wig.
Another difference is that one appears to be more natural than the other. If you guessed the lace front as the more natural-looking one, that’s correct.
Conclusion
We are happy you did if you’ve gotten here. The steps above should guide you in making your lace front wig at home. We hope the process is not stressful and your lace front wig turns out great.
Let us know how your lace wig turned out and if you sew your wefts with your hands or a sewing machine in the comment section below.


Leave a comment